Docs navigation
Building your first source
End-to-end walkthrough for a new LeadRails customer. ~30 minutes.
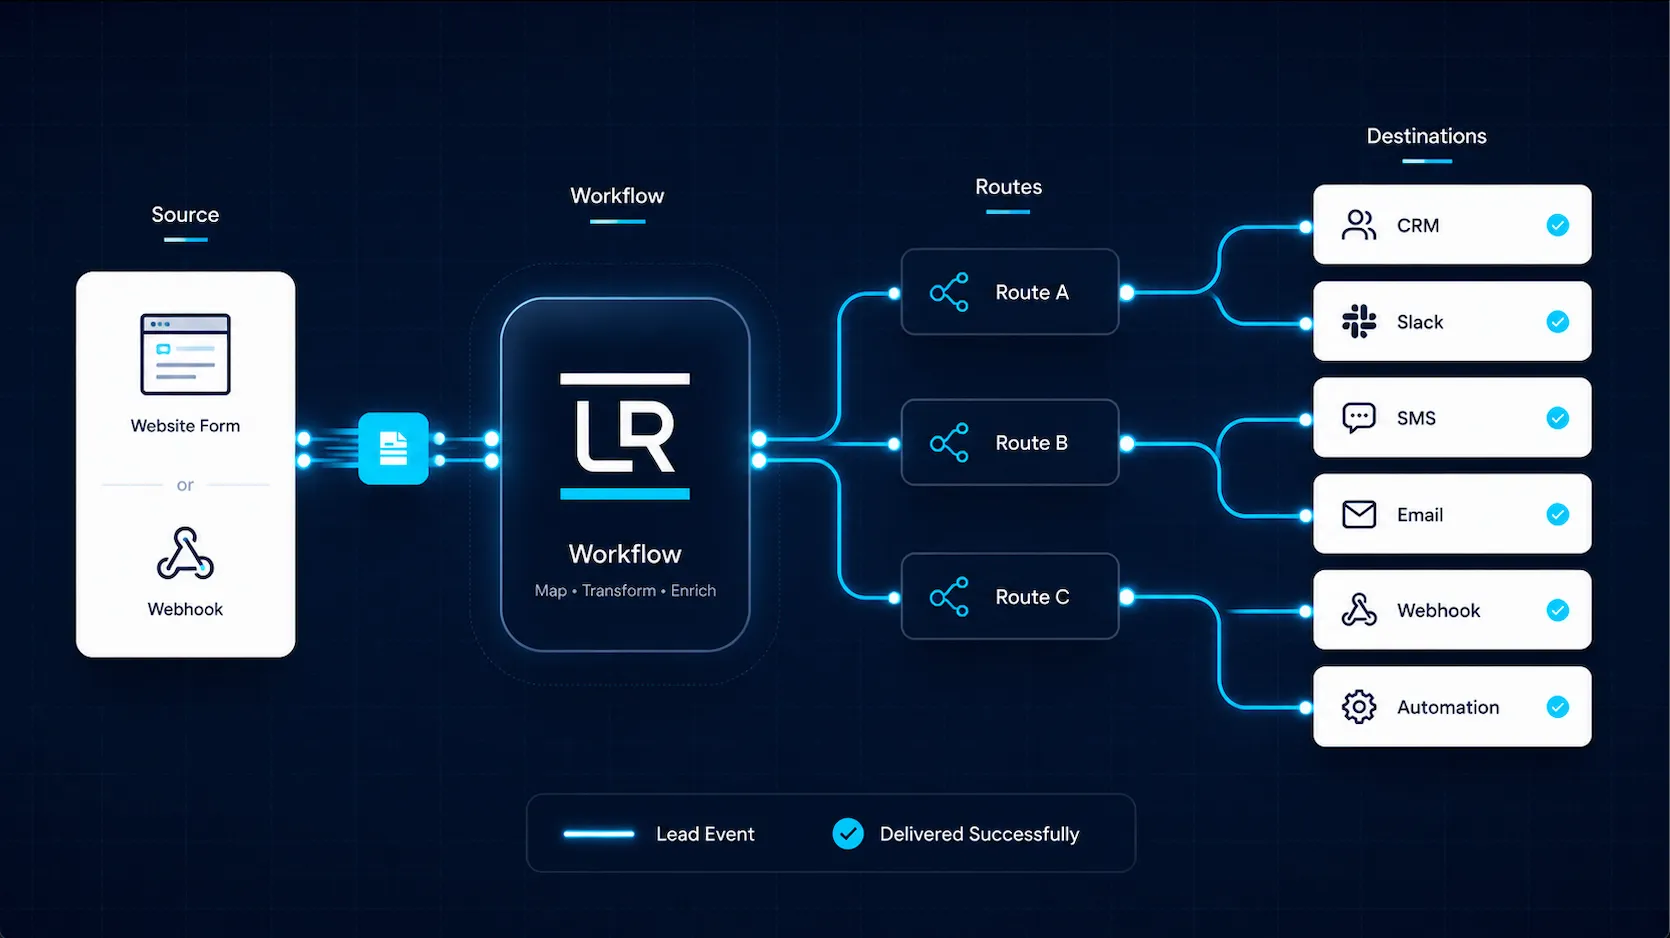
The mental model
LeadRails is a router for inbound lead events.
- Source — where leads come from. A web form, a CRM webhook, a third-party lead vendor. Each source has a signing secret your developer wires into the upstream system.
- Destination — where leads go. Slack, Salesforce, your CRM via webhook, n8n, Zapier, Make. Each has an adapter type + config.
- Route — connects a source to one destination. Optionally maps fields. Fan out by creating multiple routes from the same source — they fire in parallel.
Step 1: Create your first source (~3 min)
Open Sources in the
admin and click New Source. Name it (e.g. "Acme Pricing
Form") and pick a source type (web-form for HTML forms;
webhook for arbitrary upstreams).
On the source detail page, open the Settings tab and click Issue signing key. Copy the secret immediately — it's shown only once. Treat it like a password.
The page also shows your source ID (starts with
src_) — you'll need this when posting leads.
Step 2: Add at least one destination (~3 min)
Destinations → New Destination. Pick an adapter:
- Generic Webhook — POSTs the lead JSON to any URL. Easiest start.
- Slack Webhook — formatted Slack message.
- n8n / Zapier / Make Webhook — POSTs to your automation tool's trigger. Lets you fan out through 400+ / 6000+ / 1500+ integrations.
- GoHighLevel — creates a contact in a GHL pipeline stage.
- Housecall Pro — creates a customer in HCP.
Step 3: Connect them with a route (~2 min)
The quickest path is the setup wizard — its step 3 creates a destination and the route wiring your source to it in a single click. If you ran the wizard, your first route already exists; skip ahead to Step 4.
To wire routes by hand — to fan out, or to a destination you created separately on the previous step — open Routes → New Route and pick the source, destination, and a name like "Acme Form → Slack".
Create one route per destination for fan-out — they fire in parallel.
Step 4: Post your first lead (~5 min)
Intake endpoint:
https://intake.leadrails.dev/v1/lead-events. Each request
needs HMAC-SHA-256 signing using your source's signing secret.
Minimum body:
{
  "schema_version": "lead_event.v1",
  "event_type": "lead.submitted",
  "source": { "source_system": "web-form" },
  "lead": {
    "email": "lead@example.com",
    "full_name": "Jane Doe",
    "phone": "555-0100"
  },
  "submitted_at": "2026-05-17T12:00:00Z"
}
See docs/customer-onboarding/hmac-signing-guide.md in the
repo for Node / Python / PHP code samples.
Verifying outbound signatures (Generic Webhook)
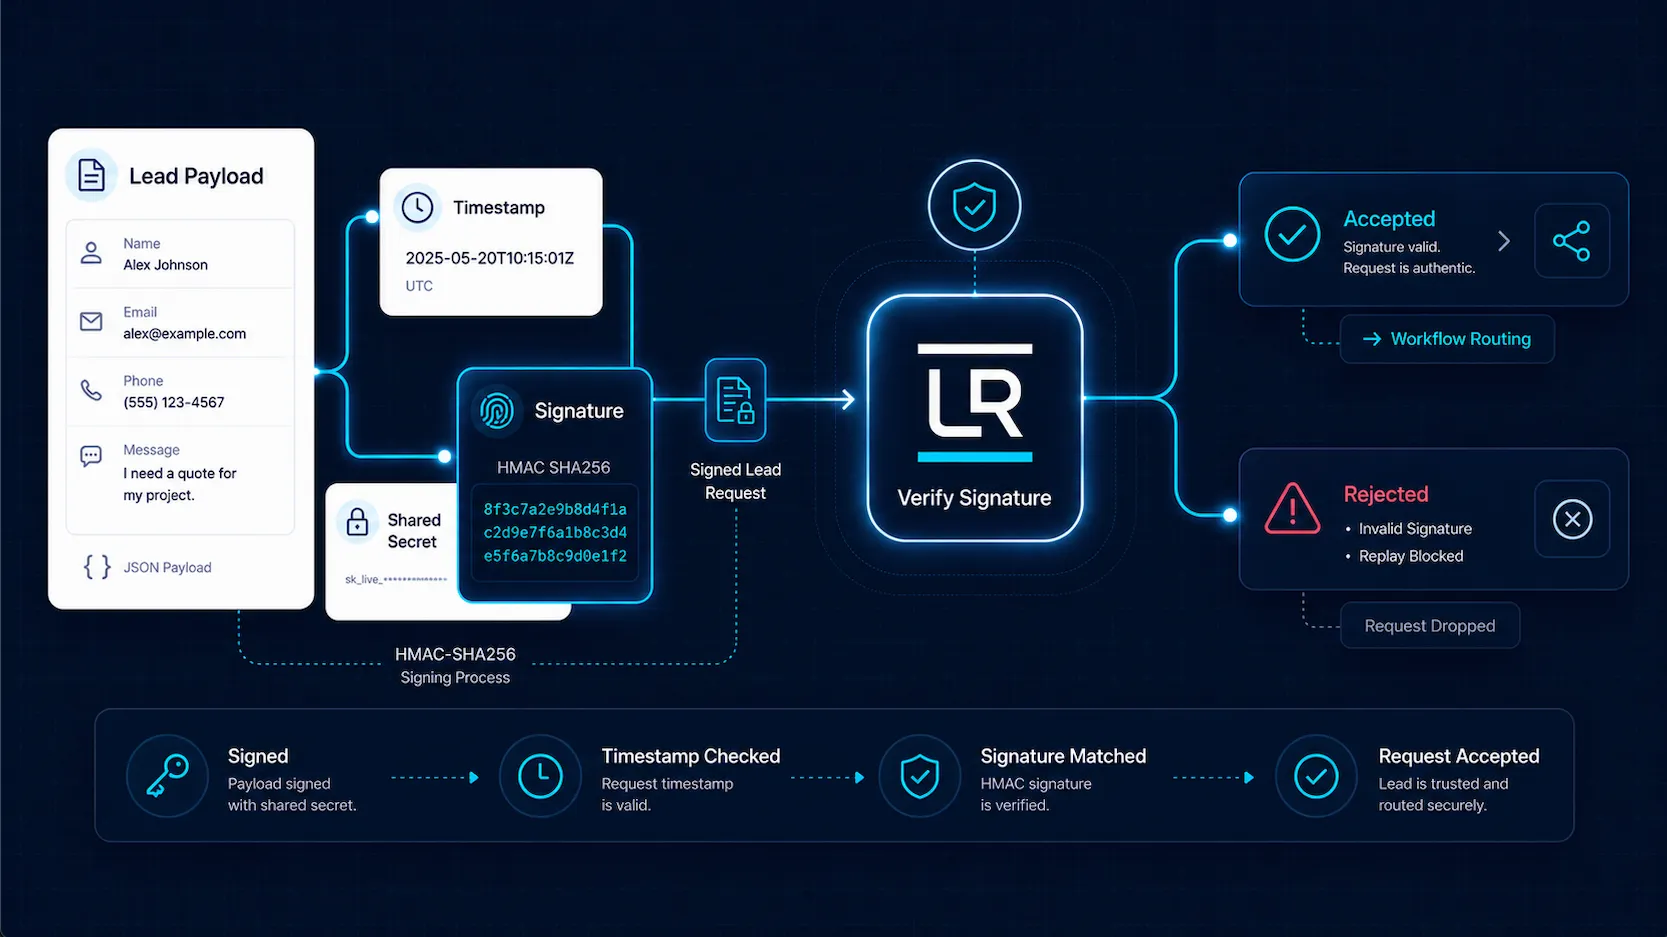
When you wire a Generic Webhook destination to your own endpoint, you should verify each delivered request actually came from LeadRails. Open the destination, expand Advanced, and create a Signing secret. Copy the value once and configure your receiver to verify it.
Each delivered request carries:
X-LeadRails-Timestamp— ISO-8601 UTC, signing-time.X-LeadRails-Signature: v1=<base64>— the HMAC.X-LeadRails-Signature-Key-Id— which secret signed it (handy during rotation).
Verification (Node):
import { createHash, createHmac, timingSafeEqual } from "node:crypto";

function verifyLeadRailsSignature(rawBody, headers, secret) {
  const ts = headers["x-leadrails-timestamp"];
  const sig = headers["x-leadrails-signature"]; // "v1=<b64>"
  if (!ts || !sig?.startsWith("v1=")) return false;

  // Reject anything older than 5 minutes — defence-in-depth against replay.
  if (Math.abs(Date.now() - Date.parse(ts)) > 5 * 60 * 1000) return false;

  const bodyHash = createHash("sha256").update(rawBody).digest("hex");
  const expected = createHmac("sha256", secret)
    .update(`${ts}.${bodyHash}`)
    .digest("base64");

  const a = Buffer.from(sig.slice(3), "base64");
  const b = Buffer.from(expected, "base64");
  return a.length === b.length && timingSafeEqual(a, b);
}
Multiple active secrets are supported for zero-downtime rotation — create a new one, deploy it to your receiver (accepting either), then revoke the old one. The worker always signs with the most recently created active secret.
Step 5 (optional): Per-route field mapping
Each adapter has a default payload shape. To customize, open the
route's Mapping page (icon in the routes table). Pick
source fields, map them to destination fields, use Mustache templates
like {{lead.email}}, set defaults, and use the live
preview to verify.
Troubleshooting
- 401 / invalid_signature
- HMAC computation off. Verify you signed the exact JSON body bytes with the right secret + timestamp.
- 404 source_not_found
- Wrong
X-LR-Source-Idheader. Check the source detail page. - 200 but destination doesn't receive it
- Check Jobs. Filter by failed status. Open a failed job — the error explains why.